Steps to setup QRadar CE 7.3.1 on CentOS 7.5 Server
Overview
QRadar Community Edition (QCE) is a free version of QRadar that is based
off of our core enterprise SIEM. This version is limited to 50 events per
second and 5,000 network flows a minute, supports apps, but is based on a
smaller footprint for non-enterprise use. Users, students, security
professionals, and app developers are encouraged to download QRadar Community
Edition to learn and become familiar with QRadar.

New features are now provided to QCE 7.3.1 users, such as reduced downtime with a new Event Collection (ingress) service, updated user interface, IPv6 improvements, password policy updates, new API endpoints, and more. QCE enables IBM Security X-Force® Threat Intelligence IP reputation data for users. The Microsoft Windows Security Event Log (DSM) is now installed by default. To install QCE 7.3.1, here’s the minimum system requirements:
- CentOS/Red Hat 7.5 operating system
- Memory - 6GB. You need 8 GB if you are using X-Force tests or Ariel queries. You might need more RAM (or an app node) for some apps.
- Disk space - 110GB. Optimal: 130 GB or higher.
- Processor - Minimum 2 CPU cores. For optimal performance, you need a minimum of 6 CPU cores if you are using X-force tests. You need a minimum of 8 CPU cores if you are using Ariel queries with X-force data.
- Network adapter - You need at least one network adapter with access to the internet. If you are using a locally hosted virtual machine with a local IP address, you must forward port 8444 to port 443 to access QRadar in a web browser. Forward port 2222 to port 22 to use ssh to connect to QRadar.
Note:
1) Your system must have internet access, or QRadar Community Edition installation fails.
2) Use 8 GB for the SWAP partition and the defaults for other partitions.
3) Disable SELinux. Restart your system after you disable SELinux or the installation fails.
4) QRadar Community Edition can't be installed in a Docker container.
For more details and updates please visit - https://developer.ibm.com/qradar/ce/
QRadar SIEM vs QRadar Community Edition – Similarities & differences
Similarities:

* You need an IBM customer number to access WinCollect
from IBM Fix Central.
Differences:

Setup steps
For my use, I have procured CentOS 7.5 machine with 16 GB RAM, 8 core
processor and 250 GB hard disk space so I can also install IBM Resilient later.
Once this machine up and running, these are the steps I followed to create the
setup -
1) I downloaded QCE ISO image from
https://developer.ibm.com/qradar/ce/
in my local disk in advance. To copy this ISO image (~3.9 GB) to CentOS machine
thru sftp I am using FileZilla. As shown below, I copied the image from my
local disk to ‘/tmp’ folder.

2)
Connect to the server remotely thru ssh. Go to ‘/tmp’
folder and mount the QCE ISO image on ‘/media’. Now, run the setup file from
the mounted volume as shown in below snapshot.

3)
Setup starts with the ‘License Agreement’
screen. Read it thru and scroll down. Once you reach the end of it, you ‘agree’
to it to proceed further.

4)
Setup checks existing RPMs and install all
necessary missing packages in OS. Once the process is over, you will see the
massage to reboot the machine.

5)
You need to reboot the machine, connect with it
again, go to the same ‘/tmp’ folder, mount the image and run setup file again
as shown below in the snapshot.

6)
Now the QRadar CE installation starts which will
take around 30 minutes or more so sit back and relax. No further input is
required from your side.

7)
Finally, when the installation process is successfully
complete, you would see below message on your screen.

8)
You need to set the admin password before you
start using QRadar from browser as shown below.

9)
Open the browser (I am using firefox) and
provide the link https://<<serverip>>.
If everything went well above, you will see the login screen as shown below.

10) In
my case, the admin password which I set in step-8, was not compliant with
policy so I was asked to change it before proceed further.

11) After
password reset and successful first login, I got the License Agreement screen
which I accepted.

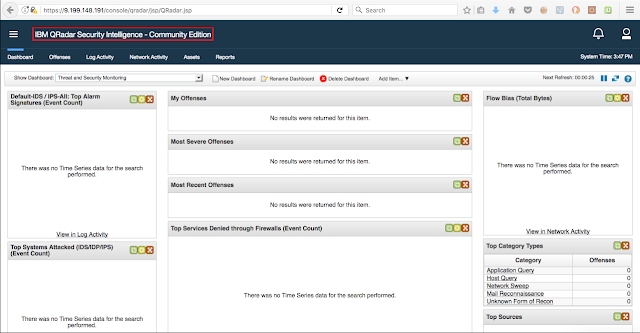
12) And
finally, I can see my QRadar CE dashboard but it’s all empty as there’s no log
sources configured.

As As
a next step, we need to know as to how to generate sample/demo log
events, security scenarios and offenses in QRadar. This next blog in the
series would help you with it - http://qradar4all.blogspot.com/2018/10/generate-log-events-for-qradar-ce-731.html
Fantastic article post.Really thank you! Awesome.
ReplyDeleteMuleSoft online course
MuleSoft onlinetraining from india